
Every few years, there is a total solar eclipse somewhere on Earth, where the moon completely blocks the sun. Total eclipses are infrequent, and having one pass over land near you is a rare privilege.
On April 8, 2024, Mexico, the United States, and Canada will experience a total solar eclipse that begins in Mazatlan, Mexico, on a path through Dallas, Little Rock, Cleveland, Buffalo, and Newfoundland, Canada.
Photographing a solar eclipse is a unique thrill, but for successful photographs, you must be prepared with the right gear and practice the sequence of events beforehand.
Stages of a total solar eclipse
A total solar eclipse occurs in five stages.
First Contact
First Contact is when the moon begins to obscure the sun and marks the start of a partial eclipse. This phase lasts ~70–80 minutes. The sun is still extremely bright, and solar filters or glasses are required to view the sun safely. As more of the sun is covered, shadows on the ground become unusually crisp, and you may feel the temperature dropping as less sunlight reaches the earth.

As you approach totality, animal behavior changes because they believe nighttime is approaching. Birds may return to roost, songbirds stop signing, or crickets start chirping in anticipation of nighttime.
Second Contact
Second Contact is the moment that the total eclipse begins, marking the start of totality. In the moments before the sun is covered, the sky darkens quickly as the umbra approaches. You can see the diamond ring effect and Baily’s Beads immediately before Second Contact. You’ll also see the red colors of the sun’s chromosphere, the second layer of the sun’s atmosphere. Eye protection is required when viewing the diamond ring, Baily’s Beads, and chromosphere.


Totality
Totality is the most awe-inspiring phase of a total solar eclipse. The moon completely covers the face of the sun, and you experience twilight in the middle of the day. Bright stars and planets may become visible, and it is the only time the sun’s corona and chromosphere are visible from Earth. Totality is the only phase of the solar eclipse where viewing the sun with the naked eye is safe.
To experience totality, you must be in the path cast by the moon’s umbra or the darkest part of its shadow. This path is known as the path of totality. Totality is brief. For the 2024 eclipse, totality will be ~3.5–4 minutes long along the centerline of the path of totality.

The sun has an 11-year solar cycle. The sun’s magnetic field flips each cycle during maximum activity. There are more sunspots, solar flares, and coronal loops during the solar maximum period. The images in this post are from the 2017 solar eclipse, which happened near a period of minimum activity with a few sunspots and prominences. You can see the corona streamers coming off the sun’s poles.
The 2024 total eclipse will happen during maximum solar activity, so there is a chance for more dramatic images. There should be a tangled web of streamers throughout the corona, and there is a better chance of seeing the magenta prominences curling in loops from the sun’s surface. If we’re fortunate, there could be a coronal mass ejection, a large eruption of solar material.
Third Contact
Third Contact marks the end of totality. As the moon moves past the sun, the events of Second Contact repeat in reverse order, with Baily’s Beads and the diamond ring effect. The sky brightens, and temperatures warm. Once again, solar filters and eye protection are required to view the sun safely during this partial eclipse.
Fourth Contact
The moment that the moon no longer obscures the sun is known as Fourth Contact and marks the end of the solar eclipse.
Find your location
Whether photographing or viewing a total solar eclipse, you want to be inside the path of totality. Here is a map showing the path of the 2024 solar eclipse in North America. There are also a variety of interactive maps online.

Weather is also crucial. If there is significant cloud cover, you’ll see nothing. The weather may be challenging in the USA and Canada for the eclipse in April 2024. Be prepared to drive to clearer skies if cloud cover is forecasted.
Get the eclipse timing for your precise location
The start, end, and totality timing varies depending on your location. Being closer to the center of the path of totality means the duration of totality is longer.
You need to have precise timing for your exact location. There are several helpful resources for this information. You can plug in the city name on the time and date website to get the timing. There are also smartphone apps, like PhotoPills or the Solar Eclipse Timer, which use the GPS location of your phone to show you the timing of each phase of the eclipse. The Solar Eclipse Timer app is interesting because it provides timed audio guidance during each eclipse phase, reminding you when to remove your solar filters and glasses and put them back on.
Photography gear
Solar filters
You need a solar filter for each lens to effectively and safely photograph a solar eclipse. Remember to use a solar filter for your eyes to view the eclipse.

A solar filter accomplishes a few things. First, it darkens the extremely bright light of the sun to a range that a camera can capture. You need a reduction of at least 16 stops of light to achieve the correct brightness. It also protects your camera sensor from damage from the sun’s radiation.
Solar filters come in two primary types. Some are made with Mylar solar film and others from glass. Either will work. Don’t be deterred by small wrinkles or unevenness in Mylar film. It doesn’t affect the image quality. The filters may be screw-in types like you are accustomed to or clamp around the lens. Some photographers purchase the Mylar solar film and craft their own.

Tripod
You want a sturdy tripod to photograph the entirety of a solar eclipse. Supporting a heavier zoom lens is crucial, and during the minutes of totality, you will be bracketing at slow shutter speeds.
Tripod head
The sun is in constant motion, and when you are zoomed in with a long zoom lens, the sun will constantly move out of your frame. Keeping the sun in the frame is easier with a gimbal or a geared tripod head. Continually adjusting a regular ball head is awkward and makes it easy to lose track of the sun during adjustments.
Check that the tripod head you plan to use can point upwards at the necessary angle. For example, in Texas in 2024, the sun will be ~65° above the horizon. Not all tripod heads can tilt to that angle, and eclipse day is not the time to discover this.
Tracker
Star trackers attach to a tripod and rotate your camera to match the earth’s rotation. While not required to photograph an eclipse, trackers can be used to keep the sun in the frame automatically.

Aligning a star tracker at night is easy because the North Star—Polaris—is visible. During the day, you’ll have to estimate Polaris’ location or use a daytime alignment app. Tracking accuracy may not be as precise, and you may have to make minor adjustments as the eclipse progresses.
In addition, some star trackers support varying speeds for stars, sun, or moon photography since all three move across the sky at slightly different rates. If your tracker is equipped with a solar speed, use it during a solar eclipse.
If you own a star tracker for night sky photography, check the load capacity. You’ll use a heavier zoom lens, and the tracker must handle the weight. Often, you need to install a counterweight to offset the weight of the lens.
Trigger release/intervalometer
A shutter release cable or intervalometer is essential, particularly during totality when you want to avoid jostling the camera using slow shutter speeds. Most modern cameras have exposure delay modes and built-in intervalometers that can also capture sequences of pictures without touching the camera, but given the rapid sequence of events during totality, we recommend using a shutter release cable.
Pick your composition & lens
There are two types of compositions for solar eclipse photos. The first is zoomed in close to the sun, capturing details of the sun’s surface, the corona, and solar prominences. The second is a wide-angle picture of the eclipse, capturing the local environment.
When zooming in to the sun, you need as much focal length as possible, up to a certain point. On a full-frame camera, somewhere around 500–1000mm provides a good size of the sun yet doesn’t fill the frame. You could zoom in more during the partial eclipse phases. However, you must be careful not to zoom in too close during totality. The corona is much larger than the sun, and you want to capture as much of it as possible. This example shows the corona reaching the edge of the frame when using a 750mm lens on a full-frame camera.

Here is a comparison of the size of the solar eclipse using various lens focal lengths on a full-frame camera:
Including the foreground in your eclipse photos will be challenging during the 2024 eclipse in North America. During the 2017 eclipse, there were many mountainous areas along the path where you could get close to the mountains and shoot upwards. However, for the 2024 eclipse, the sun will be very high in the sky. For example, in Dallas, the sun will be at an angle of about 60° above the horizon. In Cleveland, about 50° above the horizon, and Newfoundland, about 30° above the horizon. And the topography will be flat along most of the path. You’ll need a wide-angle lens, probably 14–16mm on a full-frame camera, to include the sun and foreground, and you can place the camera low to the ground and shoot at an upward angle. The sun will be tiny in the photograph at that wide angle.
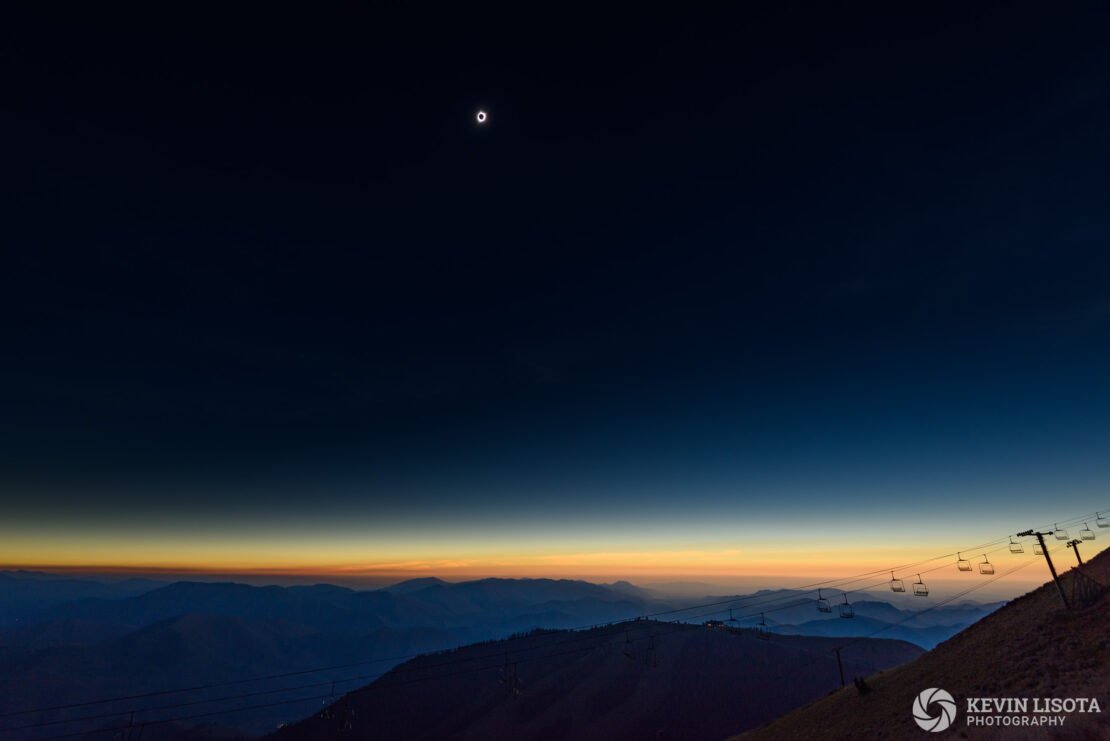
Another potential composition is to show the eclipse’s progression in the landscape. Here is that same photo overlayed with the entire progression of the eclipse. The sun kept rising during this eclipse, eventually hitting the top of the frame.

If you have a composition in mind, visit that location the day before the eclipse and practice during the same time as the eclipse the next day. The sun will be in almost the same spot in the sky so that you can see the sun’s position relative to the landscape. Remember that the total duration of the eclipse will be about 2.5 hours. If you plan to photograph the entire duration, locate the sun’s highest point to keep it in your frame.
For the 2024 eclipse, in places like New York in the Eastern US, the sun will decline in the sky throughout the eclipse, but in Texas, the sun will first rise higher, then decline as the eclipse progresses.
Viewfinder
You should always use your camera’s LCD view screen when viewing and photographing the sun, even when using a solar filter. Mirrorless cameras don’t have this issue because they have a digital viewfinder and back screen. On DSLR cameras, however, the viewfinder is optical, not digital. Staring at a highly magnified image of the sun through an optical viewfinder can still be dangerous for your eyes, even with a solar filter in place. Do not use the optical viewfinder to look at the sun during the eclipse. Always use the camera’s live view mode on the back screen.
Focus
Focusing on the sun is easy for a camera’s autofocus system if you place your focus point on the sun’s edge. If you place your focus point in the middle of the sun, there isn’t enough detail and contrast to achieve focus. If your focus point is outside the sun, the camera will hunt for focus in the black void and never correctly focus.
If you photograph a wide-angle scene, it is easiest to focus on something distant in your scene, not the sun.
Set the focus mode to manual once you have achieved focus. You don’t want the camera hunting for focus during the eclipse, and the standard focus mode on cameras will hunt for focus each time you press the shutter. Setting the camera to back-button focus mode decouples focusing from the shutter button and helps eliminate this problem, but if you don’t use back-button focus, the day of the eclipse is not the time to learn. You should also tape down the focus ring to avoid accidentally bumping it.
During the partial eclipse phase leading up to totality, you must double-check your focus about five minutes before Second Contact. Focus is the last thing you want to worry about during the chaos of totality.
Exposure settings
You need two different exposure settings for a total solar eclipse—one for the partial eclipse and different settings during totality. We recommend using Manual mode on your camera to control the settings.
To keep your exposure settings simple, fix your aperture and ISO settings for the duration of the eclipse. You are only varying the shutter speed. An appropriate aperture for most lenses is f/8, and we’ll use ISO 100, the base ISO for many cameras.
Partial eclipse
During the partial eclipse, set the camera as follows:
- Solar filter in place.
- ISO 100.
- Aperture f/8.
- The shutter speed will vary depending on how much light your particular solar filter excludes. Use a starting point of 1/640–1/800 second and adjust as needed. Set the shutter speed so the bright peak does not touch the histogram’s right edge, ensuring you capture the sun’s detail without blowing out any highlights. Your histogram should look similar to this:

When properly exposed, the sun’s center should be bright, and there should be noticeable dimming at the sun’s edge. This exposure will not change during the partial eclipse.
Diamond Ring/Baily’s Beads
About 30–60 seconds before totality, remove the solar filters from your camera so you are ready. It is not safe to view the sun with your eyes. Set your shutter speed to 1/2000 second to prepare for the diamond ring.
The appearance of the diamond ring and Baily’s Beads is the fastest, most stressful period to photograph. Set the camera as follows:
- Solar filters OFF
- Keep your aperture at f/8 and ISO at 100.
- Use a shutter speed of 1/2000 second.
The diamond ring and Baily’s Beads are incredibly bright, and you need a fast shutter speed to capture the details. You’ll still blow out the bright area for the diamond ring, but that gives the most pleasing photograph. You need a fast enough shutter speed to keep Baily’s Beads separated. These exposure settings should also work well for the magenta chromosphere visible during this phase.
As the diamond ring appears, use your shutter release cable and take at least one photo per second until the sun is fully covered.
Totality
During totality, the sun’s bright light is greatly diminished, and it is safe for you and your camera to view the sun without solar filters. Your eyes will see the fantastic white corona emanating from around the moon. However, your camera will see the far reaches of the corona much better than your eyes.
The sun’s corona extends far beyond the sun’s surface. The difference between the corona’s brightness near the sun’s surface and the corona’s outer reaches is substantial. The brightness range exceeds a digital camera’s capabilities and is too much to capture in a single photo. You need to use exposure bracketing to capture the various parts of the corona and then blend those exposures during post-processing to get a final image.
The brightness of the sun’s corona varies for each eclipse based on current sunspot activity and local atmospheric conditions, so there is no perfect exposure setting, and it is impossible to forecast. However, if you bracket your images, you can capture the dynamic range you need.
Once totality begins, there are two different methods to bracket your exposures: manual shutter speed changes and in-camera exposure bracketing. You want to capture each bracketed set in rapid succession to minimize moon movement during that set, making blending the photos easier during post-processing. Here are the steps for each method:
Manual shutter speed adjustment
- With an aperture of f/8 and ISO 100, adjust your shutter speed with the wheel on your camera and take a picture using your shutter release cable at each of these shutter speeds:
- 1/1000 second
- 1/250 second
- 1/60 second
- 1/15 second
- 1/4 second
- 2 seconds
- Repeat the process, paying particular attention to keeping the sun in the center of your frame.
- The best corona pictures are at the middle point of totality when sun coverage by the moon is at the maximum.
In-camera exposure bracketing
- With an aperture of f/8 and ISO 100, turn on your camera’s exposure bracketing mode. Use five frames covering a total range of 10–12 EV stops of exposure.
- Set your shutter speed to 1/25 second, and the bracketing increment ±3 EV stops. The result is a shutter speed range of 1/1600 second to 2.5″.
- Set your camera to continuous release mode so the bracket keeps shooting when you hold the button on your shutter release cable.
- Keep shooting the bracket sets repeatedly, paying particular attention to keeping the sun in the center of your frame.
- The best corona pictures are at the middle point of totality when sun coverage by the moon is at the maximum.
You may want to capture one frame with a longer exposure, say 4–6 seconds, to get details of the moon. A tiny amount of light still lands on Earth, is reflected, and barely illuminates the moon’s surface.
About 30 seconds before the end of totality, turn off bracketing mode, turn off continuous release, and set your shutter speed to 1/2000 second in preparation for the return of Baily’s Beads and the diamond ring. Once again, take a succession of photos about once per second when Baily’s Beads appear through the diamond ring.
About 30 seconds after totality concludes, it’s time to return the solar filters to your camera and begin photographing using the partial eclipse settings.
How many photos to take
The quantity of photos you need depends on the final images you plan to produce. If your final image is a composite showing the entire progression of the eclipse, like the photo at the beginning of this article, taking one picture every two minutes during the partial eclipse will give you 35-40 pictures to choose from during the beginning and end of the partial eclipse.
If your final image is to create a video timelapse, you’ll need far more images, probably one frame every 5 seconds.
The diamond ring/Baily’s Beads/chromosphere period goes by quickly at the beginning and end of totality. The sun characteristics in these photos change rapidly, and you want to pick the best one when reviewing your images later. Take a succession of pictures during these ~30-second phases, with at least one frame per second.
During totality, you only need one bracketed set of photos of the corona to be successful. Still, you should take at least four bracketed sets centered around the middle of totality to give options to choose from later. You should also give yourself some time to enjoy totality with your eyes.
Sequence of events
Here is a summary of the sequence of events when photographing a total solar eclipse
- Before the eclipse begins, install the solar filters, set your exposure, lock your focus, and start tracking the sun on the camera.
- At First Contact, begin photographing the sun every two minutes. (~70–80 minutes)
- Five minutes before totality—reconfirm focus and ensure focus will not change during totality.
- Two minutes before totality—stop taking photos of the partial eclipse. Set your shutter speed to 1/2000 second.
- 30–60 seconds before totality—remove solar filters from cameras. Be ready for the diamond ring, Baily’s Beads, and chromosphere.
- 20 seconds before totality—photograph the diamond ring, then Baily’s Beads and chromosphere.
- Totality—Change shutter speed and bracketing settings. Capture at least four bracketed sets of corona images, with particular attention to the midpoint of totality.
- 20 seconds before totality ends—turn off bracketing and continuous release mode, and set the shutter speed to 1/2000 second in preparation for Baily’s Beads, chromosphere, and diamond ring. Begin photographing when Baily’s Beads appear.
- 30 seconds after totality ends—install solar filters on cameras and return to settings for the partial eclipse. Begin photographing the sun every two minutes. (~70–80 minutes)
Color temperature
Most people associate yellow or orange with the color of the sun. That is the color we see when it approaches the horizon at sunset and sunrise, and the sunlight passes through more of the earth’s atmosphere. However, the color of the midday sun high in the sky is a neutral, bright white.
If you look at photos of a solar eclipse, the sun is often shown as yellow—as shown in the first image in this article. You can make this creative choice by adjusting the color temperature during post-processing. You should photograph a solar eclipse using RAW format for maximum flexibility during post-processing, including easily changing the color temperature.
Also, many solar filters have a color cast. A solar filter may make the sun appear more yellow or magenta. This is another reason to photograph in RAW because removing or changing that color cast is simpler.

Practice, practice, practice
Photographing the partial eclipse phases is relatively easy, and you have about 70–80 minutes to work with before and after totality. Totality is different. We speak from personal experience when we say this. You want to repeatedly practice the sequence of events and changes to your camera settings before the eclipse. Practicing is easy using your solar filter on any sunny day.
Totality is very exciting, but you have 3–4 minutes at most, and there is zero time to think or check your work. Photography during totality can be pretty stressful. Write down the exact timing of the eclipse and sequence of events and bring it with you to refer to it during the eclipse.
Enjoy the eclipse
Remember to stop and enjoy the experience and magical appearance of the eclipse. As a photographer, getting stuck on camera settings and forgetting to look up is easy. Many people find a total solar eclipse to be a moving experience, and it may be the only time you see a total eclipse in your life. It is worth it to pause and enjoy the moment.